Exercises
Exercise 9: Version control with Git and GitHub
Read Chapter 9 to help you complete the questions in this exercise.
Before the session. This exercise assumes Git is installed, you have a GitHub account, and RStudio can authenticate with it. That takes about half an hour and is fiddly the first time, so please work through the Setting up Git and GitHub page before you arrive. If you hit a real problem, bring it to the start of the session and we’ll help you, but we can’t get everybody set up and still teach anything, so please try first.
Up to now your safety net has been saving your script and hoping for
the best. Version control gives you something a good deal better. It
keeps a record of every version of your work, along with who changed
what, when, and why. If you’ve ever ended up with a folder containing
analysis_final_v2_REALLY_final.R, this is the thing that
saves you from it.
Git is the program that keeps that history on your computer. GitHub is a website that keeps a copy, which makes it a backup, a way to share work, and somewhere to point people who ask what you’ve been doing.
We’ll only cover the everyday loop in this exercise, which is what you’ll use ninety-nine times out of a hundred. You’ll get Git working on your own computer first, in Q1 to Q7, and only then bring GitHub into it. Keeping those two apart in your head from the start makes the whole thing a good deal easier to reason about when something goes wrong.
1. Start by checking your setup is healthy. In the R console run the situation report:
This prints a lot at once, which is normal. You’re looking for just two things. Your name and email address near the top, under the Git global heading, and a line further down confirming that a personal access token was found. There’s a picture of both at Step 7 of the setup page. Everything else you can ignore for now.
If either of those is missing, go back to the setup page and work out which step didn’t take. Ask for help now rather than at Q4, when the symptom will be an error message rather than a missing line.
2. Now create somewhere for your work to live. We’re going to make the repository on GitHub first and then bring it down to your computer, because that way the two ends are connected from the start and there’s less to go wrong.
Go to github.com and log in. Click the + in the top right and choose New repository. If you can’t see it, your Repositories tab has a green New button that does the same thing.
Name it
pu5058-practical. Leave the visibility as Public. Switch Add README on. Then, in the Add .gitignore dropdown just below it, choose the R template. That last one is easy to miss and it saves you a job later, so check your form looks like this before you click Create repository.
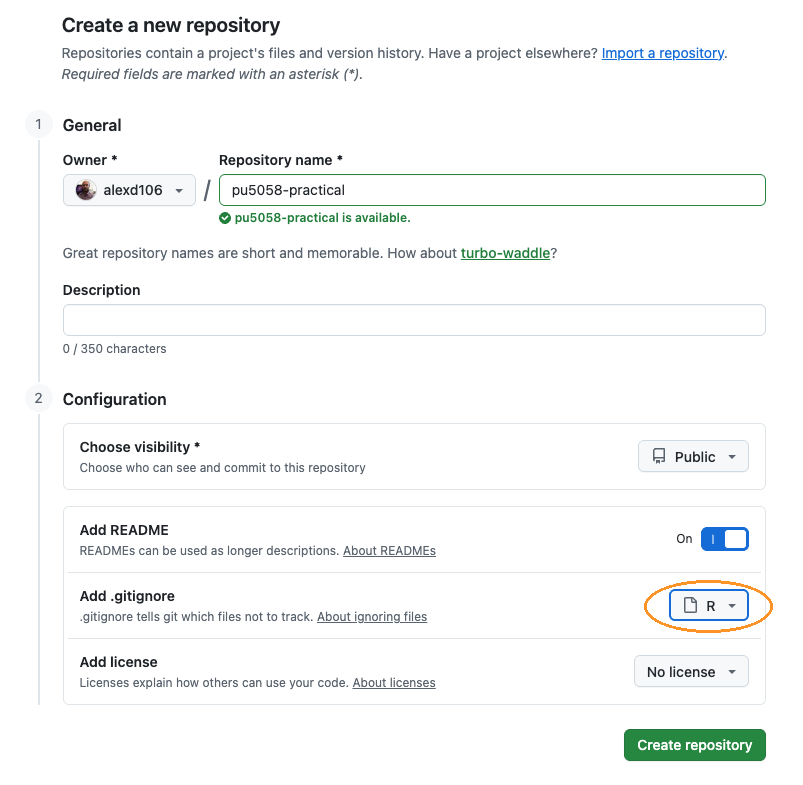
On the page that appears, click the green Code button, make sure HTTPS is selected rather than SSH, and copy the web address. It will end in
.git.In RStudio, go to
File->New Project.... The window that opens gives you three ways to make a Project, and you want the third one.
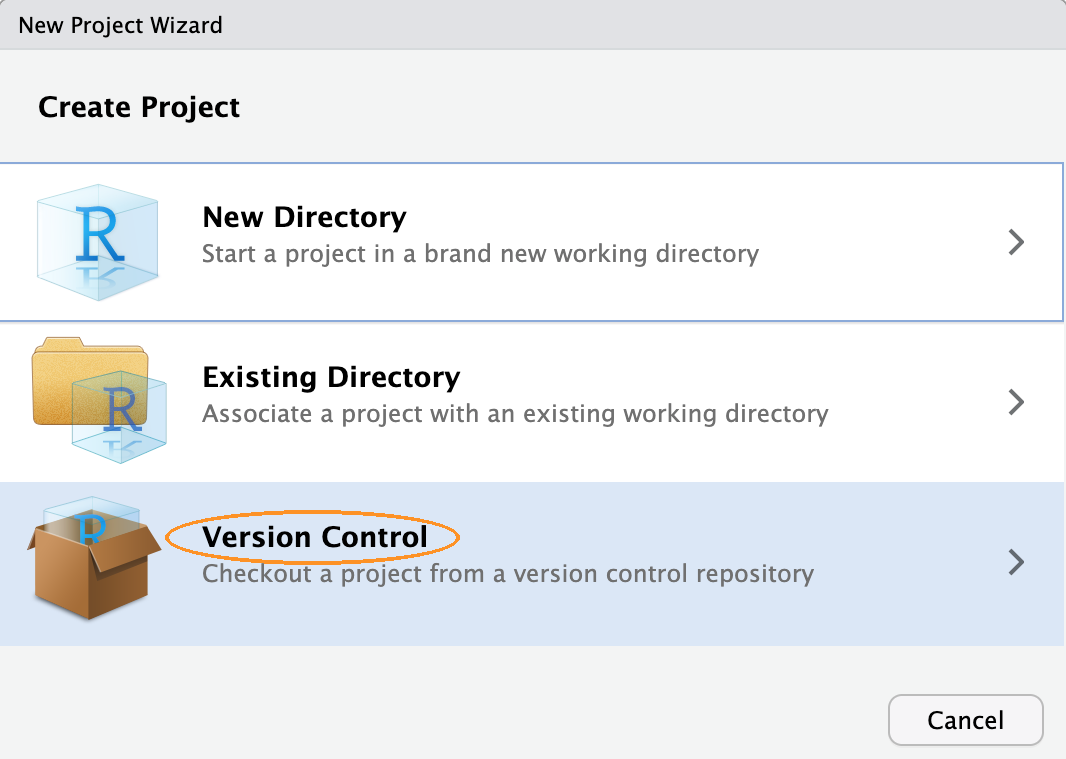
Choose Version Control, then Git. Paste the address into the ‘Repository URL’ box. The ‘Project directory name’ box fills in on its own. Under ‘Create project as a subdirectory of’, browse to wherever you keep your work for this course, then click Create Project.
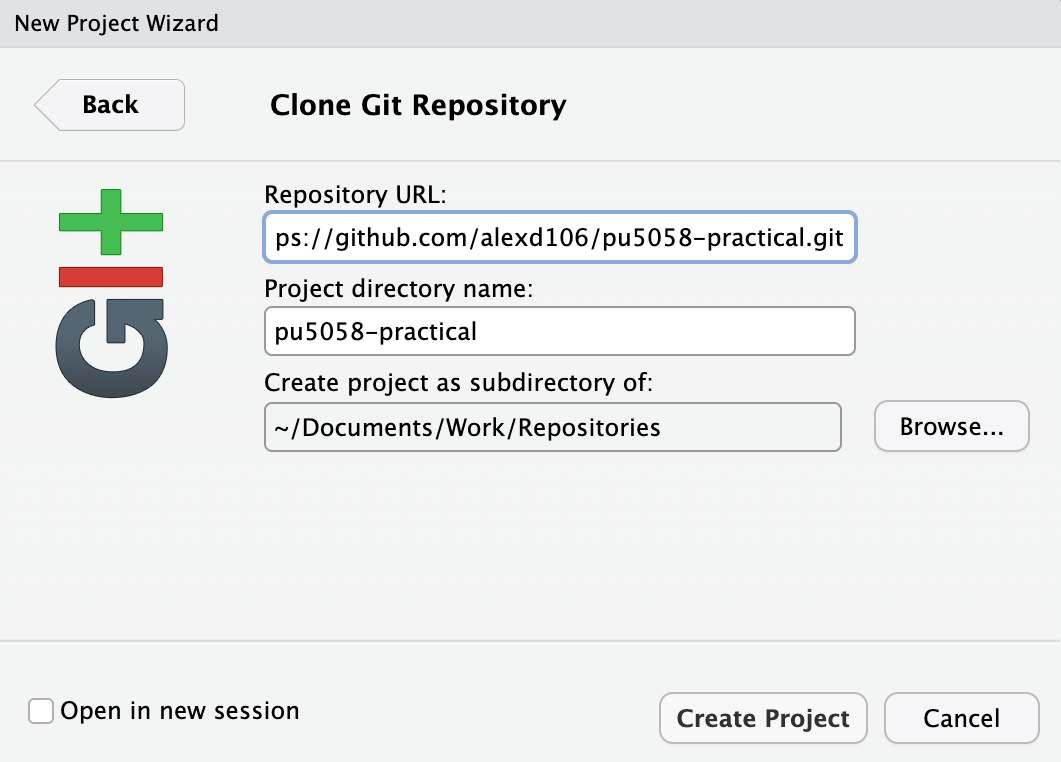
If there’s no Version Control option in that first window, RStudio hasn’t found Git on your computer. That’s Step 3 of the setup page, and the situation report in Q1 doesn’t check it, so this is where you find out.
RStudio restarts and opens a new Project containing the README and
the .gitignore that GitHub made for you. You now have the
same repository in two places, one on your computer and one on GitHub.
Keeping those two in step is what the rest of this exercise is
about.
Note this is a different Project from the one you’ve used for Exercises 1 to 7. That’s deliberate, so you’re not putting the whole course under version control today.
3. Before you touch anything, let’s get our bearings. Find the Git tab in RStudio, which unless you’ve moved your panes around will be in the top right one alongside Environment and History. It only appears in a Project that’s under version control, which is why Q2 came first.
There isn’t much in it yet. You should see a single file,
pu5058-practical.Rproj, which is the Project file RStudio
made for you a moment ago. Everything else that came down from GitHub is
already being looked after by Git, so there’s nothing to report about
it.
Find each of these, without clicking yet:
- the Staged column of tick boxes
- the Diff button, which shows you what changed
- the Commit button
- the Pull and Push buttons, the down and up arrows
- the History button, the little clock
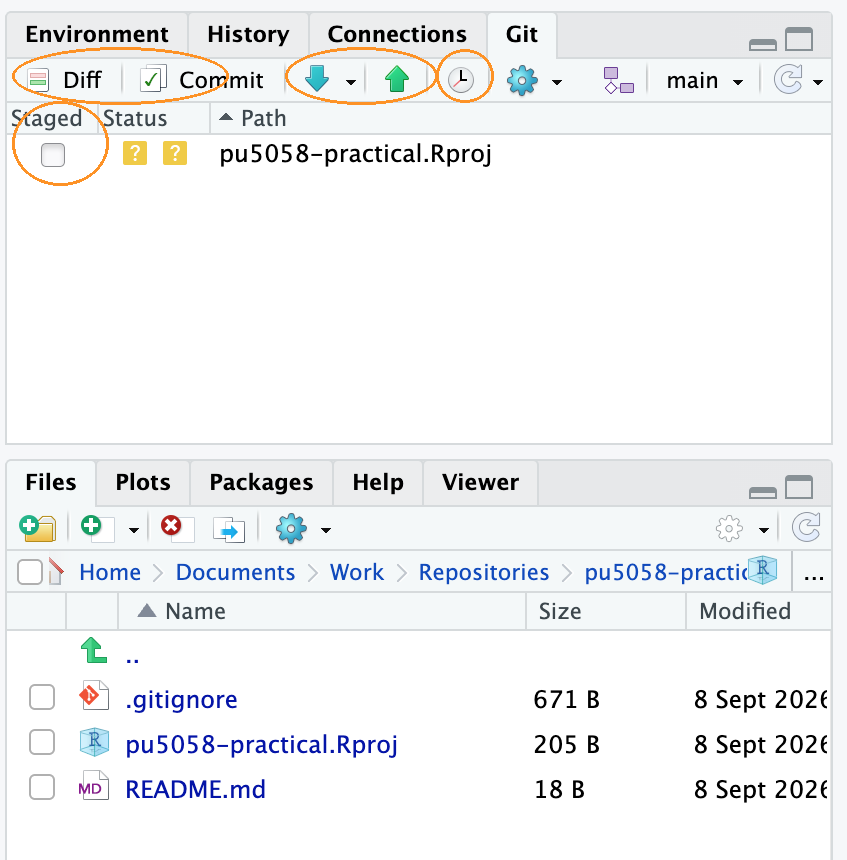
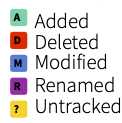
The coloured icon beside a file tells you what Git currently makes of
it. A yellow ? means Git can see the file but isn’t keeping
track of it, which is the case for pu5058-practical.Rproj
right now. You’ll meet a blue M for a file that’s been
modified and a green A for one you’ve staged as you work
through the next few questions. Here is the full set:
4. Time to make your first commit and we’ll work through this slowly to begin with. First we’ll need something worth saving. Rather than inventing something we’ll use the R markdown report you built in Exercise 7.
- Remember, the report needs two folders alongside it to knit properly, so using your computer’s file manager (Finder on a Mac, File Explorer on Windows) copy all three of these into your new Project folder:
cardiac_report.Rmditself- a
datafolder containingcardiacdata.txt - an
outputfolder containingex6_admissions.png
The file paths written inside the report are relative to the
.Rmd file, so those two folders have to keep their names
and sit right next to it. You’re copying rather than moving because this
is a different Project from the one you’ve been working in. If you
haven’t got a working report of your own, download the finished one from
the Exercise 7
solutions.
Next, open the
cardiac_report.Rmdin RStudio and knit it (hit the Knit button, remember?). Do this before you go anywhere near Git, so that you know the report renders correctly. Knitting also produces yourcardiac_report.pdf, which you’ll come back to in Q7.Now look at the Git pane. Several things have appeared, all with a yellow
?, because Git can see them but isn’t keeping track of any of them yet. Tick the Staged box next tocardiac_report.Rmd(only that one at the moment). Its icon changes to a greenA, for ‘added’. We’ll deal with the other files in a bit as we need to make some decisions about which files we want Git to track.Click the Commit button in the Git pane. A window opens showing the file you staged and, underneath, every line you’re about to record. Type a message in the ‘Commit message’ box on the right. Make it say why you made the change rather than just what you changed. I suggest something like ‘add cardiac report from Exercise 7’. A message like ‘update’ isn’t very useful, and in six months you’ll be grateful you wrote a proper one. Click the Commit button in that window, read the confirmation, and close it.
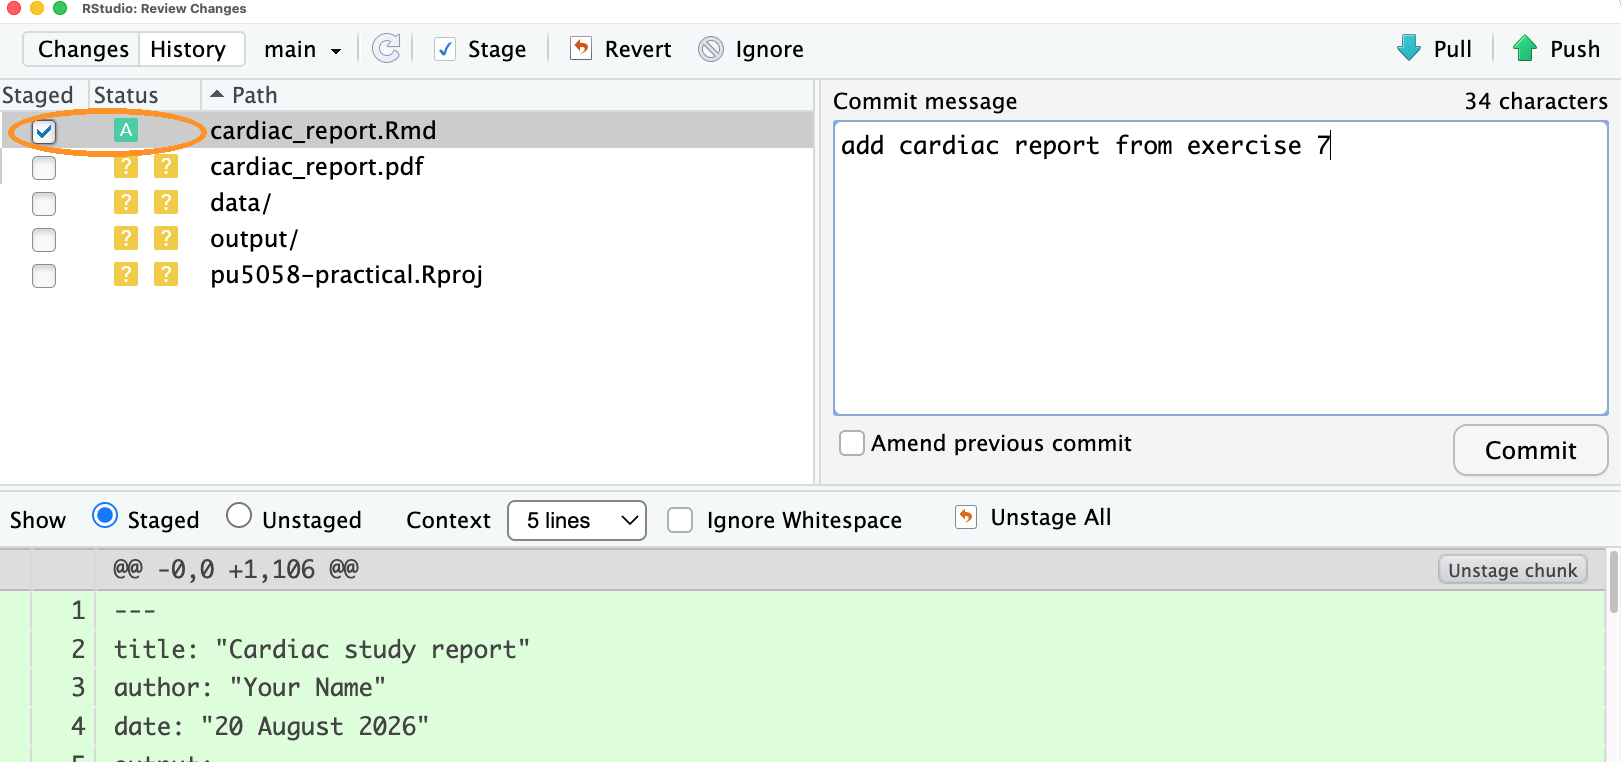
Your report is now recorded in the history, and notice that it all happened on your own computer. Nothing has gone anywhere near GitHub yet. We’ll get to that in Q8.
A line has also appeared at the top of the Git pane saying that your
branch is ahead of ‘origin/main’ by 1 commit. origin/main
is Git’s name for GitHub’s copy of your work, and that line is Git
telling you the two copies have drifted apart. The number will go up
each time you commit, and it goes back to nothing when you push commits
to GitHub (Q8).
5. Now let’s do this process again to reinforce it. Open the
cardiac_report.Rmd again, find the sentence in your data
description that begins ‘These data come from a cohort study’, and
reword it to say that the study is unpublished. Save the file. Notice
that it now reappears in the Git pane, this time with a blue
M for ‘modified’.
- Before you commit, select the file and click the Diff button in the Git pane.
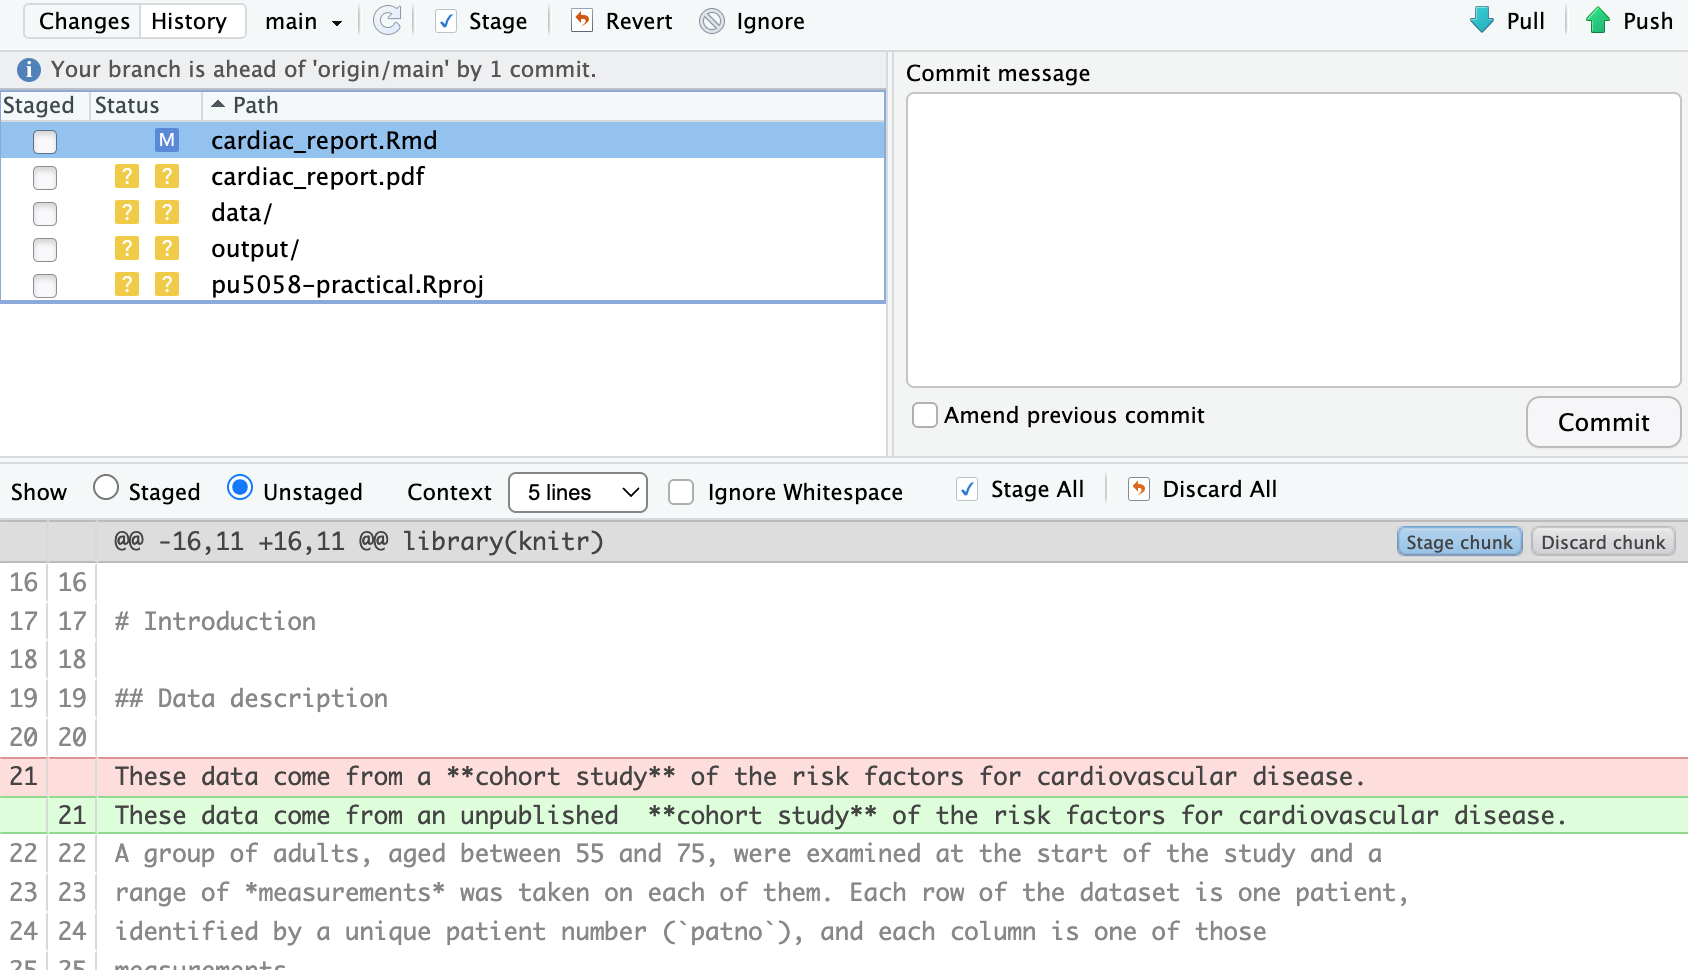
Read what it shows you. Added lines are green, removed lines are red, and the unchanged lines around them are there for context. Notice that Git has recorded your reworded sentence as one line removed and one line added, because Git works a line at a time and has no idea that the two are almost the same. Getting into the habit of looking at the diff before committing can help catch mistakes later on.
Notice too that the diff is of your .Rmd file rather
than the PDF. Git is designed for plain text, which is exactly what an R
markdown file is and it is one of the reasons for writing a report this
way rather than in Word.
Stage it and commit it with a sensible message (‘add publication status to data description’), again without pushing. Close the commit dialogue window.
Now click History, the clock icon in the Git pane. You’ll see your two commits at the top, most recent first, with the
Initial committhat GitHub made for you sitting underneath them. Click on the top one and the panel below fills in with the details of just that commit, including the changes it contained and its SHA, the long string of letters and numbers that is the commit’s name. You’ll come back to that panel in Q10.
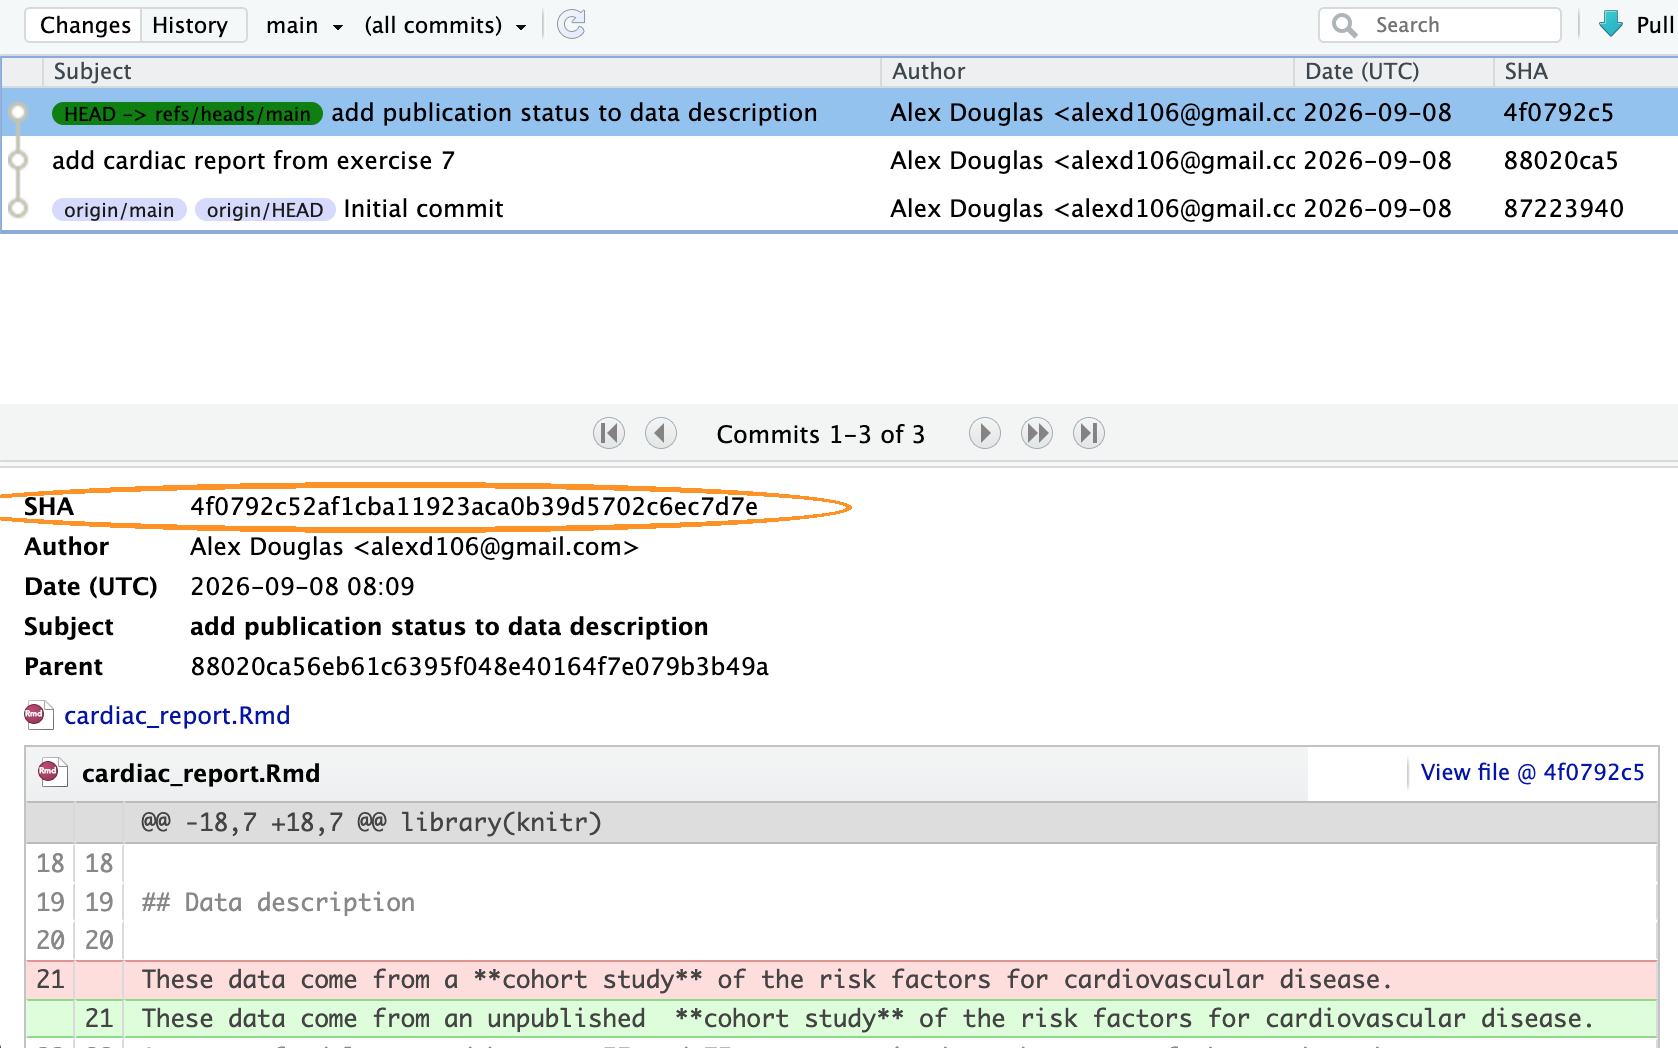
This history is the part that makes version control worth the trouble. The backup is useful, but being able to look back at what you did, and why you did it, is even more useful.
6. OK, so everyone makes changes they wish they hadn’t and the great
thing about Git is that it gives you a way back. So let’s make an
intentional mistake in our cardiac_report.Rmd file and then
recover.
- Open your report, delete the whole
chol-plotcode chunk that draws the boxplot, and save it. Do not commit. Now click oncardiac_report.Rmdin the Git pane to highlight it, click the blue gear icon along the top of the pane and choose Revert…. Say yes to the warning, then look at your report again and the deleted chunk is back.
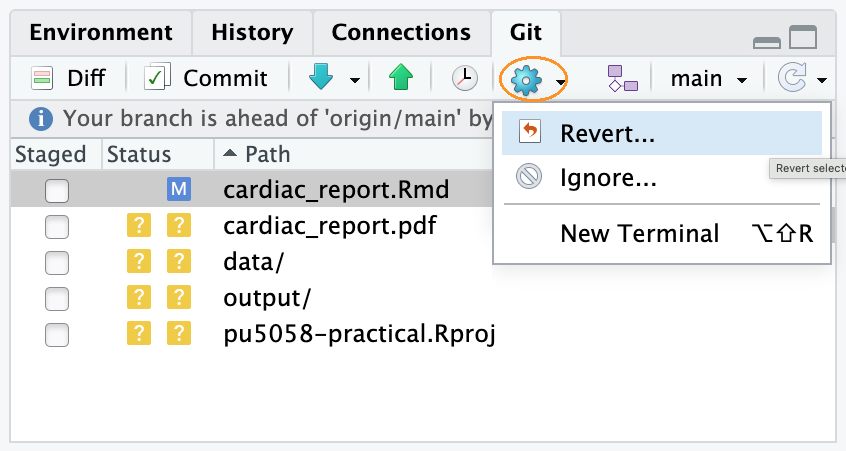
Be careful with this one. It’s not an undo button. It throws away everything you’ve changed since your last commit, not just the last thing you did, and there’s no way back. Commit often and you’ll rarely need it.
- Now a subtler one. This time, do the following so that you can see what changes.
In your R markdown report, find the ## Results heading
and change it to something more useful, say
## HDL cholesterol and smoking status. Save the file, stage
it, and commit it with the message
change Results heading.
Now let’s say you’ve just realised you meant to do a bit more than
that. Underneath that heading, add a sentence saying what the figure
below it shows (something like ‘This figure shows HDL cholesterol in
patients by smoking status.’). Save the file and stage it again, but
this time, before you click Commit, tick Amend
previous commit. Notice that RStudio fills the message box back
in with change Results heading for you. Then go ahead and
Commit as usual.
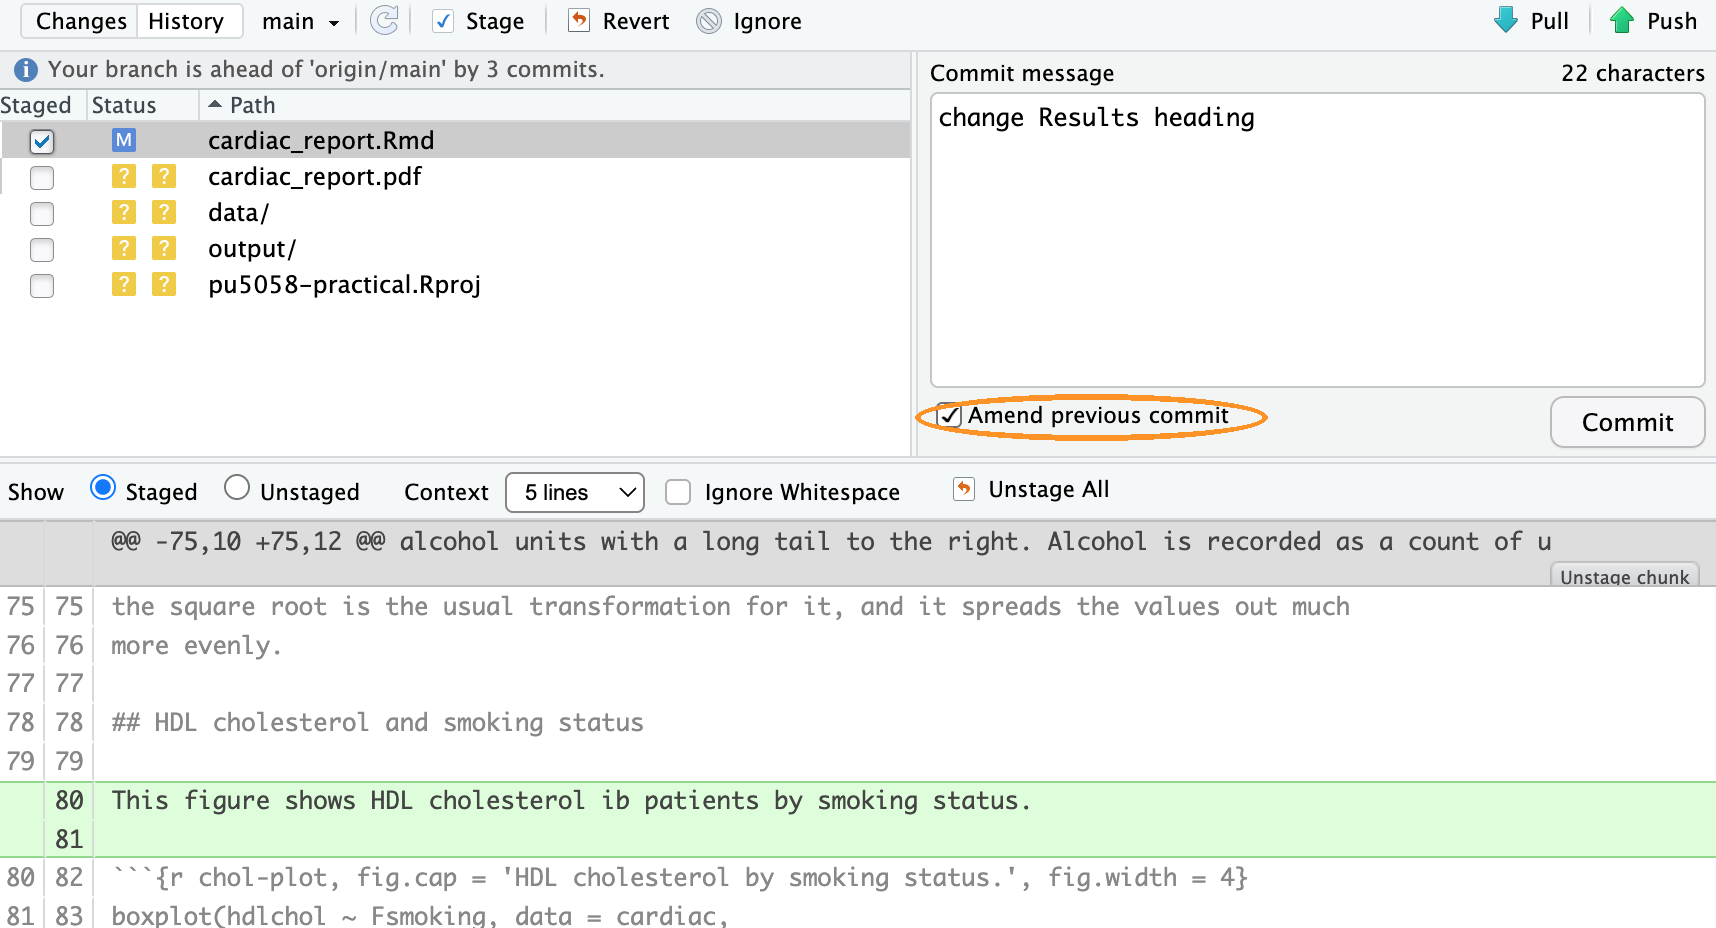
Click the History icon. You made two separate changes and clicked Commit twice, but there is only one new commit, holding both of them. That is what amending does: rather than adding a commit, it replaces the previous one.
You’re safe doing this here because you haven’t pushed anything to GitHub yet. Once a commit is on GitHub other people may already have it, and rewriting one at that point causes them problems, so treat Amend previous commit as something you only ever use on work that is still on your own machine.
7. Before we send any of this to GitHub, we need to decide what’s
worth sending. Open the .gitignore file in your Project
(you’ll see it in your ‘Files’ pane). This is the list of things Git
deliberately ignores. When we set up our GitHub repository back in Q2,
we chose the R template, which gave us a sensible starting point.
Read through it. You might recognise
.Rhistoryand.RDataamong others.Look back at the Git pane.
cardiac_report.pdfis still sitting there with a yellow?from Q4, and it will reappear every time you knit. We don’t need to track this file as anybody with our.Rmdfile and the data can produce it again in one click. To stop Git tracking it we just need to add the file name to the end of our.gitignorefile. Once you save it,cardiac_report.pdfwill disappear from the Git pane and.gitignorewill appear in its place, because we’ve changed it and it is tracked.
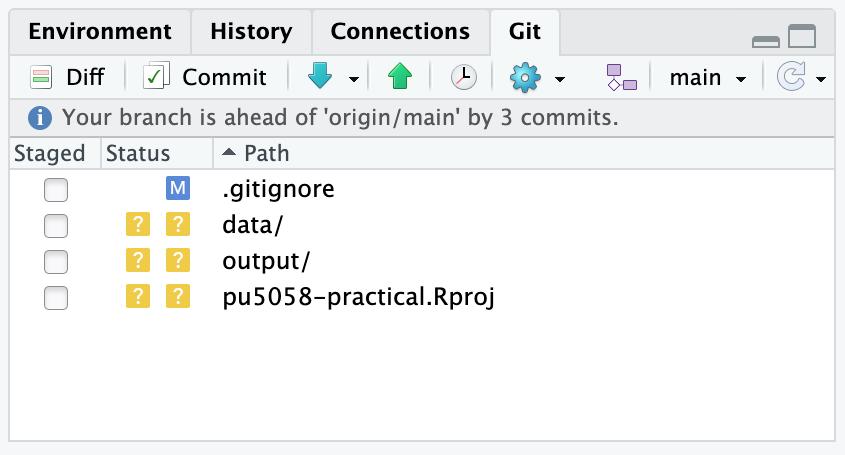
If you’re on a Mac you may also see a file called
.DS_Store in the pane, which Finder writes into every
folder you open and which has nothing to do with your work. Add that to
.gitignore too if it bothers you.
Notice that the gear menu you used in Q6 also has an Ignore… option, which adds the selected file to
.gitignorefor you rather than making you type it. It’s up to you which one you prefer (you don’t need to do both!).Now think about your
outputfolder. It holdsex6_admissions.png, and your report can’t knit without it. If you ignored that folder, anybody who cloned your repository would get a report that fails on the last figure. So we will need to track this folder (we’ll do this in just a sec).Last of all, think about your data.
cardiacdata.txtis small, unchanging and not confidential, so committing it is reasonable and makes the project self-contained. Real patient data would be a different matter entirely. Never put confidential data or passwords in a repository, and be especially careful with public repositories as deleting a file doesn’t remove it from the history.So let’s put that into practice. The folders
data/,output/and the filepu5058-practical.Rprojhave been sitting there untracked since Q4, and all three belong in the repository. The first two because the report needs them, and the third because it is what makes the folder an RStudio Project for anybody who clones it.
Stage those three and the .gitignore you just edited,
commit them with a sensible message, and look at the Git pane
afterwards. It should be completely empty. Everything you wanted is now
in the history and everything you didn’t is being ignored, which is
exactly the state you want a project to be in before you send it
anywhere.
8. OK, let’s stop for a moment before we do anything else. Everything
you have done up until now has been local. Every commit
you made in Q4 to Q7 went into a hidden folder inside the
pu5058-practical directory on your own computer and GitHub
has no idea that any of it happened. Go back to your repository page in
your browser and refresh it. All you should see is the README and the
.gitignore files that were created when we first set this
repository up back in Q2.
Git gives you the version control (the history) and GitHub is about to give you the backup (and a way to collaborate with others). Everything from here is about keeping the two in step. So let’s ‘push’ all our changes to GitHub.
Click on the green Push arrow, the up arrow in the Git pane. A window opens showing you a summary of what Git did.
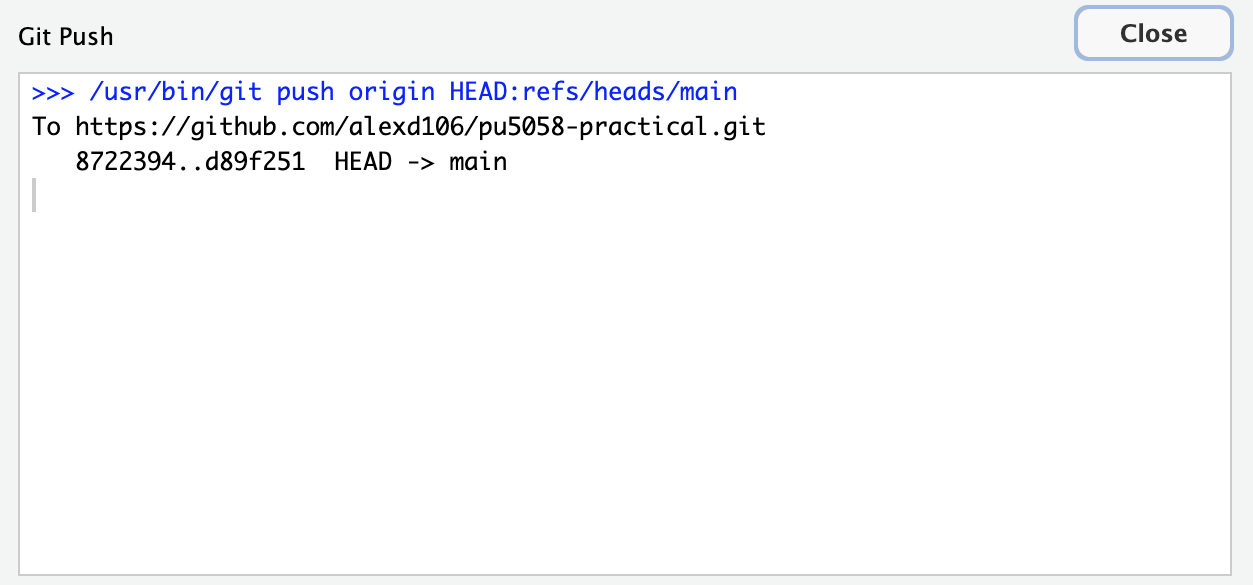
Wait for it to finish, close it, then go to your repository page on GitHub in your browser and refresh.
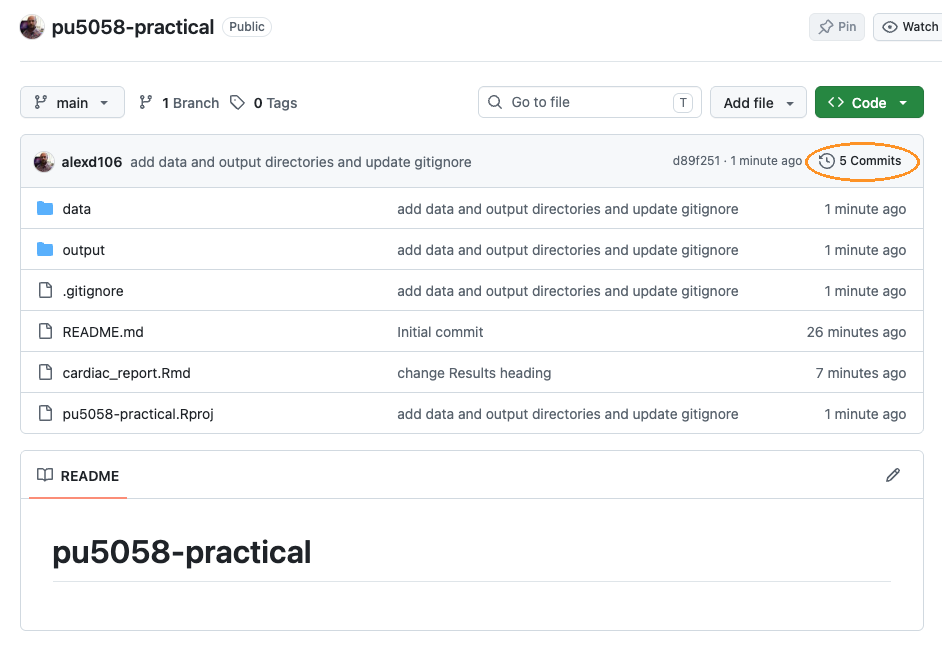
With any luck, your R markdown report is there, and so are the data,
the figure and the .Rproj file, which means somebody could
clone this repository and knit your report themselves. So is every
commit you made along the way, not just the last one. Push sends
everything Git has that GitHub hasn’t. Click on the commit count button
near the top of the file list on the right and you’ll see them all, with
the messages you typed. Back in RStudio, the line telling you that your
branch was ahead of origin/main in the Git pane has also
gone, because the two copies now match.
If the push fails with a message about authentication then your token is the problem rather than anything you’ve done here (see the last section of the setup page). Everything you have committed is safe on your computer either way so don’t panic!
9. OK, let’s go one more time around this workflow all the way through to GitHub without stopping. Change, stage, commit, pull, push. That sequence is what you’ll be doing all the time when using Git, so it’s worth doing once from end to end now that you know what each step is for.
Open
cardiac_report.Rmdand add a sentence of your own at the end of the text, under the last figure and just above the## Session informationheading, saying what you would look at next if you had more time. It doesn’t really matter what you put, just write something sensible. Now save the file.Click Diff and read the change (just to confirm), then stage the file and commit it with a message saying what you added and why.
Before you push, click Pull, the blue down arrow. You’ll get a short message telling you that everything is already up to date, which is exactly what you’d expect. You’re the only person working on this repository, and the only things on GitHub are the things you put there.
Having said that, it’s still a good habit to get into. When you’re working with other people, they’ll have been committing while you were, so you need to pull their changes down before you push yours up to keep the two copies in step. If you both change the same lines of the same file and neither of you pulls first, Git can’t tell which version is right and asks you to sort it out. That’s a merge conflict, and sorting one out is a lot more work than the quick pull you skipped. So my advice is to Pull before you push, even when, as today, there’s nothing to pull.
- Now click Push, and refresh your repository page on
GitHub. Click on your
cardiac_report.Rmdfile in the file list to display its contents and your sentence should be there, just above the## Session informationheading.
10. Last of all, the question everybody gets to sooner or later. You’ve pushed something, and then realised it shouldn’t have gone.
Both of the ways of undoing things you’ve met so far were for work that was still on your own computer. Revert… in the gear menu, from Q6a, throws away changes you haven’t committed yet, and you’ve committed this one. Amend previous commit, from Q6b, replaces your last commit, and as we said at the time it’s only safe before you push. So neither of them will do here. What you need is a way of undoing the change that leaves the history alone.
That something is git revert, which adds a new
commit that is the exact opposite of an old one. The original stays in
the history, the new one cancels it out, and anybody who already has
your work simply gets one more commit. Be careful with the name, because
RStudio’s Revert… button and the
git revert command do quite different jobs. Unfortunately
there’s no button for git revert in RStudio, so this is the
one place in this exercise where you type a Git command yourself.
First, look at the Git pane and make sure it’s empty.
git revertwon’t run if you have uncommitted changes lying around. If you have any, commit them.Now we need to find the commit you want to undo, which is the one you made in Q9. Click History (the clock icon), and click on that commit. Its full SHA appears in the panel underneath, which is a long string of letters and numbers. This is the commit’s name. You only need the first seven or eight characters, so copy those, or just write them down.
Open the Terminal in RStudio. It’s the tab next to the Console in the bottom left pane. If it isn’t there for some reason, go to the
Tools->Terminal->New Terminalmenu, or use Shift+Alt+R (Option+Shift+R on a Mac). The Terminal isn’t the R console. It talks to your computer directly rather than to R, so R commands won’t work in it.In the Terminal type the following line, with your own SHA (the one you just copied above) in place of the one below, and press enter:
git revert --no-edit 1b0f779
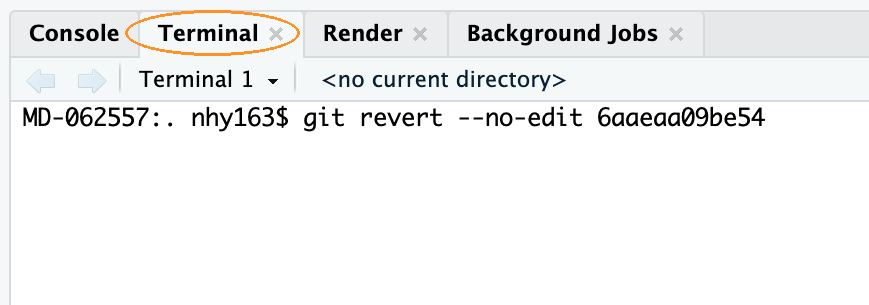
The --no-edit part matters. Without it Git opens a text
editor so that you can write a commit message, and whilst that can be
useful, the editor it opens is one that’s genuinely hard to get out of
if you’ve never met it. With --no-edit, Git writes a
sensible message for you. Since the commit you’re undoing is the most
recent one, you could also have written
git revert --no-edit HEAD, because HEAD is
Git’s special name for wherever you are now.
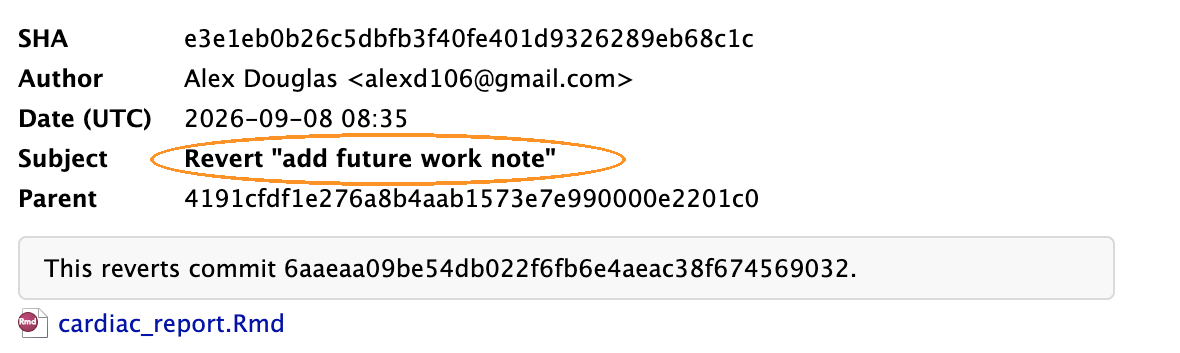
- Look at your report. The sentence you added in Q9 has gone. Look at the Git pane and you’re one commit ahead of GitHub again, although you may have to click the refresh icon, the circular arrow on the right of the pane, before RStudio notices what you did behind its back! Click History and you’ll see both commits, the one that made the change and the one that undid it, so the record of what happened is complete. Click on the new one and the panel below shows you the message Git wrote for you. It names the commit it has just undone, and that SHA should look familiar because it’s the one you copied back in Q10b.
- Now Push as usual, and refresh your GitHub page in your browser. The report is back to how it was before Q9, and your Git history says why.
You can use git revert on any commit in your history,
not just the most recent one, by giving it that commit’s SHA. Be clear
about what it does though. It undoes the changes that one commit made,
it doesn’t wind your whole project back to how it looked at that point.
That’s the general answer for anything that’s already public. Once a
commit has been pushed, you undo it by adding another commit rather than
by taking one away. There are many other Git commands to learn and I’ve
given you some links to additional resources below.
Where to go next
Git can do a great deal more than this. Branches let you work on something risky without disturbing the version that works. Forks and pull requests are how people contribute to each other’s projects. Merge conflicts, the ones described in Q9, have a set of tools of their own once they get beyond the straightforward. None of that is needed for this course, and all of it is easier to learn once the everyday loop in this exercise is second nature.
When you want to go further, the standard reference for R users is Happy Git and GitHub for the useR, which is free online. Section 9.6.4 of the Introduction to R book gives an overview of how collaboration works.
One more thing before you go. The website you’re reading this on is built from a public GitHub repository, using exactly the tools in this exercise. The Source code link in the menu at the top of this page will take you to it.
End of Exercise 9