Setting up Git and GitHub
Before you start
You don’t need this at the start of the course. It’s needed for Exercise 9, and there’s no advantage in doing it earlier. The access token you create in Step 5 has a limited life, so setting it up months in advance only means renewing it sooner.
This page gets your computer talking to GitHub. It takes about half an hour and it’s fiddly the first time, which is why we ask you to do it before the Exercise 9 practical rather than during it.
Please work through it beforehand. If you hit a real problem, bring it to the start of the session and we’ll help you, but we can’t get everybody set up and still have time to teach anything, so do try first.
You only ever do this once per computer.
Step 1: Install Git
Git is a separate program from R and RStudio, and you need it installed before RStudio can use it. There is a fuller version of these instructions in Appendix B of the Introduction to R book.
Windows. Download Git for Windows and run the installer. There are a lot of screens and you can accept every default on all of them. The installer also adds a program called Git Bash, which we won’t use on this course but which does no harm.
macOS. The simplest route is to let your Mac install
it for you. Open the Terminal application (press Cmd+Space, type
Terminal, press Enter), type git --version and
press Enter. If Git isn’t installed, macOS will offer to install the
command line developer tools. Accept, and wait for it to finish. The
only other time you’ll need the Terminal on this course is the last
question of Exercise 9. If you’d rather use an installer, there’s one at
git-scm.com.
Linux. Git is often installed already. Check with
git --version. If not, use your package manager:
sudo apt install git on Debian or Ubuntu,
sudo dnf install git on Fedora.
Step 2: Create a GitHub account
Git runs on your computer. GitHub is a website that stores copies of your work and is what makes it a backup rather than just a filing system.
Sign up for a free account at github.com/join. You need a username, an email address and a strong password. Choose a username you’d be happy for a future employer to see, because quite a lot of people put their GitHub profile on a CV.
Two-factor authentication is a good idea and takes about five minutes to set up with an authenticator app on your phone. It’s not required for what we’re doing, so don’t let it hold you up now. You can add it later from your GitHub account settings.
Step 3: Tell RStudio where Git is
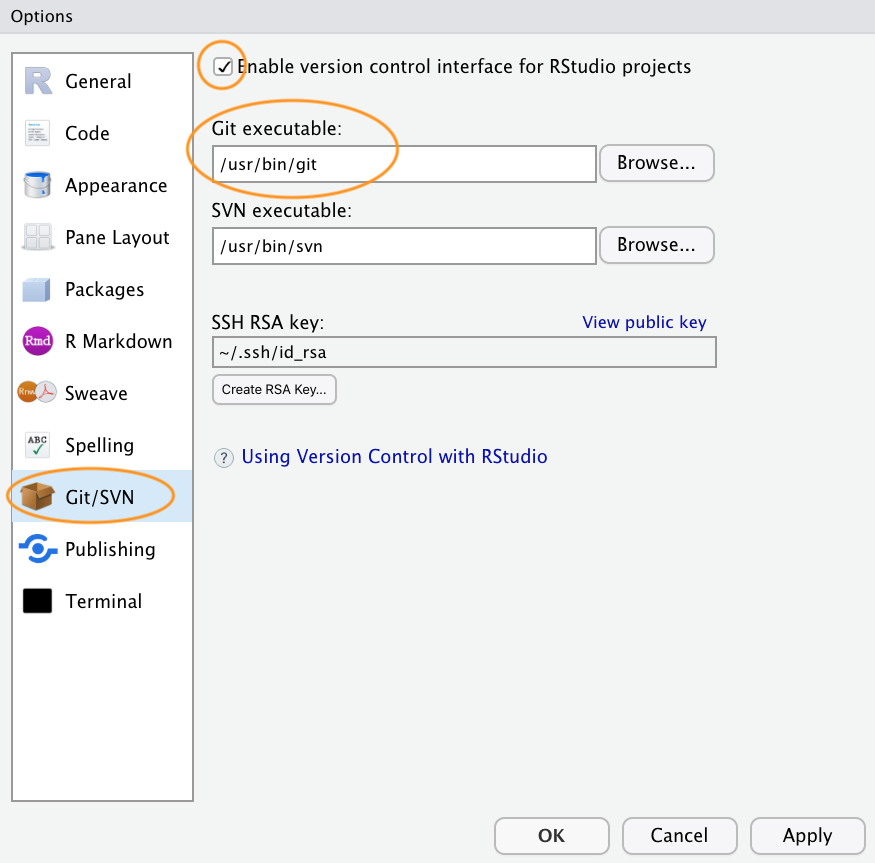
Open RStudio and go to Tools ->
Global Options -> Git/SVN.
Check that ‘Enable version control interface for RStudio
projects’ is ticked, and that the ‘Git
executable’ box has a sensible path in it. On Windows this
usually ends in git.exe, on macOS and Linux in
git.
If the box is empty, click Browse... and find the
program you installed in Step 1. Restart RStudio afterwards.
Step 4: Tell Git who you are
Git labels every change you make with a name and an email address, so you need to give it those once.
You may have seen this done in a terminal. We’ll use the
usethis package instead, so that everything happens in the
R console you already know. Install it first if you haven’t already:
Then:
Use the same email address you signed up to GitHub with. The name is what will appear against your changes, so use your real one.
That library(usethis) line lasts as long as your R
session and no longer, so if you come back to this page in a few weeks
you’ll need to run it again before any of these functions will work.
While you’re here, set the default name for the main line of work in new projects:
GitHub has called this main since 2020. Git itself still
uses the older name master unless you tell it otherwise,
and the mismatch causes confusing errors later. You’ll meet both names
in the wild.
Step 5: Create a personal access token
This is the step people get stuck on, so it’s worth reading carefully. Section 9.4.5 of the Introduction to R book covers the same ground.
When you send your work to GitHub, it needs to know it’s really you. GitHub stopped accepting your account password for this in 2021. Instead you use a personal access token, which is a long string of characters that works like a password for one computer, and which you can cancel without changing anything else about your account.
Run:
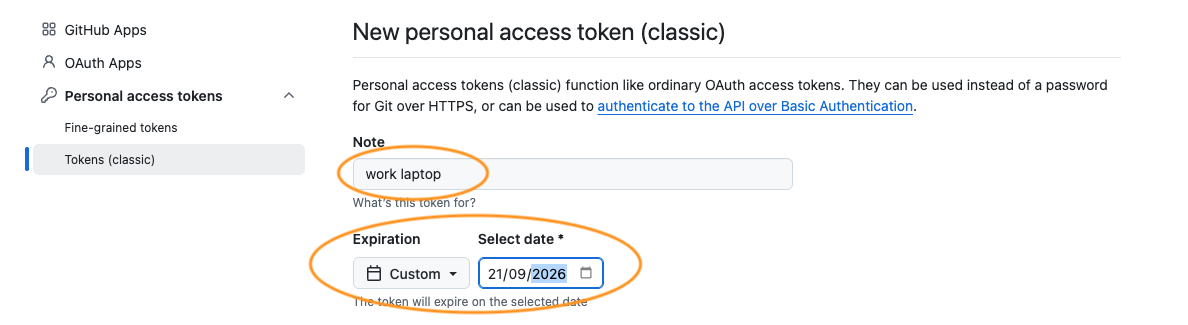
This opens GitHub in your web browser with a form already filled in with the right permissions. Before you click the green Generate token button at the bottom, change two things:
Note: replace whatever is there with something that will still mean something to you in six months, such as
PU5058 laptop.Expiration: click the dropdown and choose
Custom, then pick a date about six months from now. GitHub suggests 30 days by default. Thirty days is better security practice, but it means your token stops working part way through this course, probably at the worst possible moment. We’re deliberately trading a little security for not being locked out when you most need it. When you finish this course, go back to shorter-lived tokens.
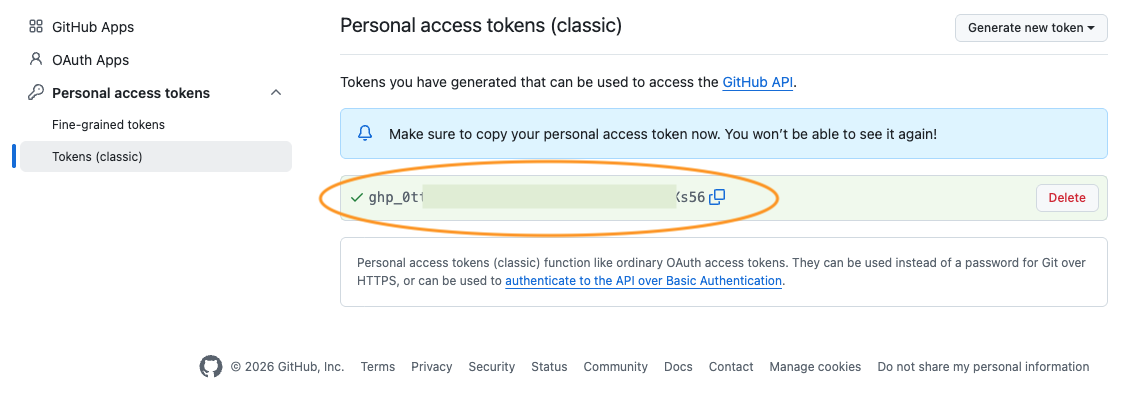
Now click Generate token. GitHub shows you the token exactly once, on a green background. Copy it now. If you navigate away without copying it you can’t get it back and will have to make another one, which is annoying but harmless.
Step 6: Store the token
Give the token to your computer’s password store so you never have to type it again:
Paste the token when prompted and press Enter. You already have
gitcreds, because it comes along with usethis,
so there’s nothing extra to install. If R tells you there is no such
package, run install.packages("gitcreds") and try
again.
Step 7: Check it all worked
git_sitrep() is short for ‘Git situation report’. It
prints everything about your setup in one go, including which Git you
have, the name and email you set in Step 4, and whether it can find and
use your token.
Read the output even though nothing has gone wrong. Knowing what it looks like when things are healthy is what makes it useful later on when they aren’t. The lines to check are your name and email, and a line confirming a personal access token was found.
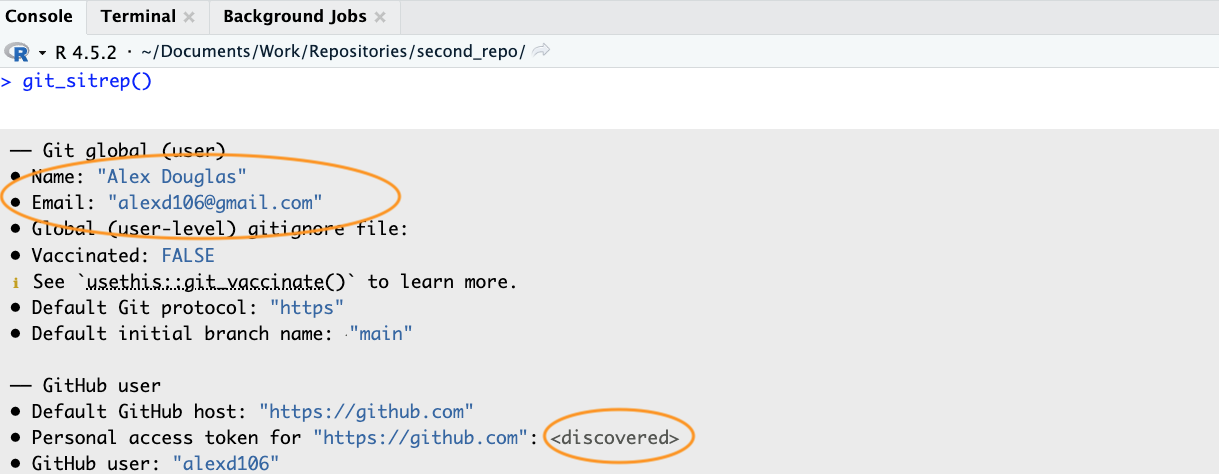
git_sitrep() output.If anything looks wrong, go back to the step that set it. If you
can’t see what’s wrong, bring the git_sitrep() output to
the session and we’ll look at it together.
When your token expires
Your token will expire eventually. This is normal and nothing is lost when it happens.
The symptom is that pushing or pulling, which worked perfectly well last week, suddenly fails with a message about authentication. The fix is to repeat Steps 5 and 6. You’ll be doing this in a new R session, weeks or months later, so load the two packages again first:
library(usethis)
library(gitcreds)

create_github_token()   # generate a fresh one
gitcreds_set()          # it will offer to replace the old one - say yes
git_sitrep()            # check
Your work is on your computer and on GitHub throughout, so an expired token is a five minute annoyance rather than a disaster.
Where to go if you are stuck
The standard reference for R users is Happy Git and GitHub for the useR, which covers everything on this page in far more detail, including what to do when the usual routes don’t work.